Automatic File Backup Windows 10
As is well known, it is just a matter of time that the hard
drive stops working. In addition, laptop stolen, virus attack, a critical
error, etc. may lead to data loss. To protect those valuable documents, photos,
etc. and avoid data loss, performing auto file backups is the best way.
But, the files may change at any time. When you modify it or
add some comment on it, you need to back it up again. Therefore, to set up a
scheduled backup is convenient even though you forget to back up files.
Besides, automatic file backup is helpful for those persons
who don't have a habit of backing up.
How to Automatically Back up Files to an External Hard Drive
Before starting the scheduled backup, you should decide
where to save the backup, and which tool to use for auto file backup in Windows
10.
Preparation Work:
1. Where to store backup
For Windows automatic file backup, an internal hard drive,
external hard drive, and flash drive are available. In this part, we take
automatically back up folder/files to external hard drive as an example.
2. Automatic Backup Tool
As to regular backups, using third-party automatic file
backup software is suggested. In addition, some of you choose to use Windows 10
File History or Windows Backup and Restore (Windows 7).
Automatically Back up Files to External Hard Drive Using MiniTool
ShadowMaker
Which is the best free backup software for Windows 10
automatic file backup?
When choosing the backup program, you should consider the
price, functions, and safety. MiniTool ShadowMaker is your best choice.
As the best free
backup software, it is compatible with Windows 10/8/7 with advanced &
flexible backup features.
And there is no need to manually copy and paste files as
long as you set a scheduled backup plan, it will help you automatically back up
specific folders with important files to an external hard drive.
What's more, the operation can be performed periodically,
for instance, daily, weekly, monthly, etc. By default, incremental backups are
created.
Besides, this auto backup software supports not only file
backup, but also system, partition and disk backup.
To automatically back up files to an external hard drive in
Windows 10, now free download MiniTool ShadowMaker on the Windows 10 PC for a
try. Or get Pro Edition to use
all the time.
How to back up files regularly in Windows 10?
Automatic File Backup in Backup Page
Step 1: Double-click on MiniTool ShadowMaker to open it.
From the following figure, you know this Windows automatic backup software
allows you to choose the local computer to manage, as well as the remote backup
is supported.
Just click one Connect button to start automatic
file backup.
Step 2: Suppose that you don't have a backup, this software
will ask you to click SET UP BACKUP button under the Home page
to go on.
Step 3: In the Backup window, you will see
MiniTool ShadowMaker has selected system partitions as the backup source and a
destination folder to save the backup image.
① Here, you intend to back up files automatically,
thus, please click Source section to go to the following window and
click Folders and Files to continue.
Under the Computer tab, all detected partitions
are listed. Just open the partition that contains important files, and check
all the needed files.
② To back up files to an external hard drive in Windows
10, click Destination section and choose a partition on the external
hard drive as the storage path.
Step 4: Go back to the Backup page, and
hit Schedule feature to set up scheduled backup for the files or
folders.
By default, Schedule option is disabled. Please
turn it on. Then, you know this Windows 10 automatic backup software allows you
to set up automatic backup daily, weekly, monthly, as well as when logging on
or logging off PC.
Step 5: After all settings are made, please click Back
up Now button to execute the full backup process.
Importance:
l At
the specific time point that you have configured, automatic file backups will
be created.
l Schedule
feature takes the incremental backup method by default so as to save storage
space to the highest degree.
To manage disk space by removing some old backup files, ask
Scheme feature for help.
Automatically Back up Files Using Windows 10 File History
In Windows 10, there is a feature named File History,
enabling you to choose specific folders to back up.
By default, it backs up all folders including desktop,
documents, pictures, music, downloads, OneDrive, etc. in the user account
folder (C: /Users/account name).
Most importantly, File History can automatically back up any
file that has been changed or added, which is similar to Time Machine in OS X's.
How to set up scheduled backups with File History?
Step 1: Firstly, connect an external hard drive to your
computer.
Step 2: Open Settings from
the Start menu.
Step 3: Go to Update & security > Backup.
Step 4: Under Back up using File History section,
click Add a drive option to select a partition on your external hard
drive to store the backup files.
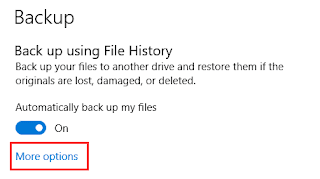
Step 5: The Automatically back up my files option
appears and is turned on. Next, click More options to enter the following
interface.
Step 6: Then, click Back up now to start the
backup.
Besides, you can configure how often File History backs up,
how long it keeps those backup copies, and which files it backs up.
By default, File History can back up files automatically
every hour but you can choose another time, for example, every 10, 15, 20 or 30
minutes, 1, 3, 6 or 12 hours, or once a day. Just choose one for Windows 10
automatic file backup based on your needs.
Just choose one suitable tool when there’s need.


